


Practicing good balance is important at all ages and especially as we get older. Having good balance and continually practicing it from a young age can keep you from falls and help you stay more independent when you’re a senior.
When using the Chirp Wheel to practice balance, use extra caution and tools to guide you. If you find these balance poses difficult with the wheel, stay tuned for more ideas on how to practice balance without the wheel, which is what we would recommend for beginners.
Using a smaller wheel to start practicing your balance will be easier because you’re closer to the ground and have more control. (Pictured is the 12 inch wheel, which will be most difficult to balance on.) These poses will challenge your balance and increase your flexibility.
How to roll out and maintain balance
For tips on keeping your balance while rolling out on the wheel, go to this blog post.
Intermediate to Advanced balance poses
Note: For all poses using the wheel, use caution. It’s best to use the wheel on a yoga mat to increase traction. Always consult your physician before beginning any new exercise regimen. The information provided is not intended to prevent, diagnose or treat any medical condition or disease. If you experience any pain, dizziness, discomfort or difficulty with any of the exercises depicted or while otherwise using the Chirp Wheel, please stop and consult your physician. Engaging in any exercise regimen involves the risk of injury. Chirp Wheel shall not be liable for any claims for injuries or damages resulting from or connected with the use of the Chirp Wheel. Users purchase and use the Chirp Wheel entirely at their own risk.
Wheel lunges


- For this pose, it will help to have a blanket to place under your resting knee for comfort. It is also recommended that you have yoga blocks or stable furniture to support you if you start to lose balance.
- Begin by kneeling on a blanket with the wheel in front of your right leg. Have stable objects on either side of you for support. If you’re using a yoga mat, face the front of your mat.
- While holding on to your stable objects, lift your right leg up and place your foot in the center of the wheel.
- Imagine your hips pulling toward the ground as you sink deeper into the stretch. Try focusing on a single spot on the wall to help maintain your balance.
- Keep your shoulders up high and pulled back, maintaining good posture.
- If you’d like to challenge your balance further, place your palms on the ground to the left of your wheel and straighten your left leg into a full lunge.
- Hold this position for 15 to 30 seconds. Repeat on the other side.
Straight leg balance

- For this pose, it will help to have a blanket to place under your resting knee for comfort. It is also recommended that you have yoga blocks or stable furniture to support you if you start to lose balance.
- Begin by kneeling on a blanket with the wheel in front of your right leg. Have stable objects on either side of you for support. If you’re using a yoga mat, face the front of your mat.
- While holding on to your stable objects, lift your right leg up and place your foot in the center of the wheel. Roll the wheel forward with your foot as you straighten your leg so your right ankle is resting on the wheel.
- Try focusing on a single spot on the wall to help maintain your balance. Keep your shoulders up high and pulled back, maintaining good posture.
- Hold this position for 15 to 30 seconds. Repeat on the other side.
Inner leg stretch

- For this pose, it will help to have a blanket to place under your resting knee for comfort. It is also recommended that you have yoga blocks or stable furniture to support you if you start to lose balance.
- Begin by kneeling on a blanket with the wheel to the right of your right leg. Have stable objects in front of you for support. If you’re using a yoga mat, face the side of your mat.
- Place your palms on the ground in front of you as you lift your right leg up and place the inside of your ankle on the top, center of the wheel.
- Imagine your hips pulling toward the ground as you sink deeper into the stretch. Try focusing on a single spot on the wall or ground to help maintain your balance.
- Keep your core tight to help maintain your balance and to avoid back pain. Maintain the natural curvature of your spine.
- Hold this position for 15 to 30 seconds. Repeat on the other side.
Side reaches


- Start from the inner leg stretch position for this pose.
- Reposition your right foot so the back of your ankle is resting on the wheel.
- Use your stable objects if you need help as you lift your upper body up, reaching your hands to the sky.
- Reach and stretch your hands up to the sky and over toward the wheel for a balance-challenging side stretch. Hold for 15 to 30 seconds.
- Return to center and reach up and over to the opposite side of your body, resting your left palm on the ground as you stretch your right side.
- Hold this position for 15 to 30 seconds. Repeat on the other side.
Cat/Cow with wheel


- Begin in a plank position with the wheel between your feet.
- Lift your right leg and place it in the center of the wheel. (Note: you may need to roll the wheel toward the center of your body a bit before placing your foot on the wheel. Do what comes easier to you.)
- Roll the wheel toward your head as you bend your right leg so your knee is directly under your hips.
- Slowly and carefully lift your left leg up and straighten it straight back in the air. This might be enough for now.
- If you’d like to challenge yourself further, pull your left leg in toward your navel into a crunch. Simultaneously pull your head in too, like the Cat Pose in yoga. Return back to a straight leg in the air and a straight spine (Cow Pose). Repeat 3 to 5 times.
- Do this on both sides.
Wheel plank and crunch


- Start on your hands and knees with the wheel in between your hands.
- Grab the top of the wheel with both hands putting your weight onto the wheel. Stay here until you feel balanced enough to move on.
- When you’re ready straighten both legs back into a plank position. Hold for 15 to 30 seconds.
- If you’d like to challenge yourself further, pull your right leg in toward the wheel in a crunch and rest back down. Repeat 5 to 10 times.
- Do this on both sides.
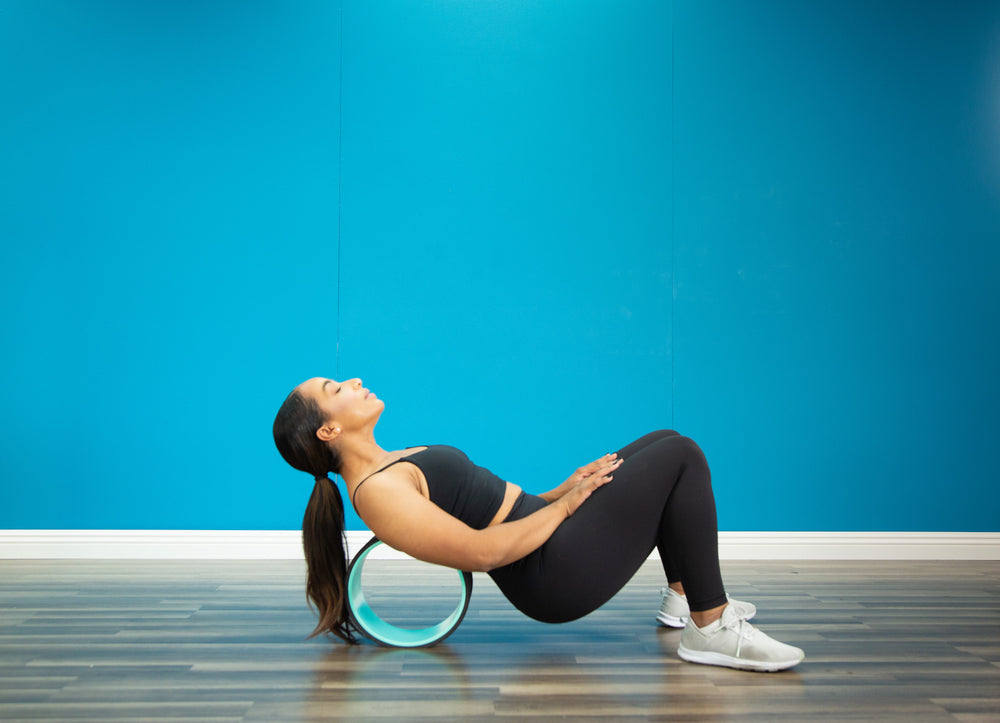
Back stretch
Sit and lean back.
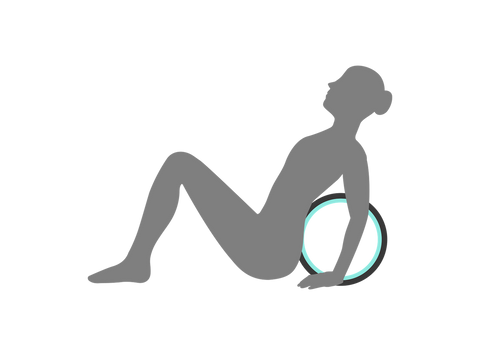
- Sit on the ground with knees bent and feet firmly planted.
- Place the Chirp Wheel+ against your back in alignment with your spine. Take some time to center yourself and find balance even on the ground.
- Lean back gently to transfer your weight to the wheel. Relax and find balance in this position before lifting your hips.
Lift hips.

- Rest your hands on the ground, the wheel, or your chest for balance. Do whichever feels the most comfortable for you.
- Lift your hips upward while relaxing your back. Find balance with your hips lifted before rolling on the wheel.
- Don’t tense up! The more you relax your back, the better it will feel.
Roll back and forth.
- Begin to roll back and forth on the wheel by bending and straightening your legs. Use your hands for balance. If one spot on your back needs an extra massage, stop rolling to put pressure on that spot. Or switch to a smaller wheel.
- Roll out for 3 to 5 minutes. Length of preferred use will vary by individual.
- Relax your head back to avoid neck pain.
References
BrettLarkinYoga. (2017, April 3). How to use a yoga wheel | strength & flexibility sequence | yin yoga (50-min). Retrieved from https://youtu.be/uXOLpQtA9G8
Mayo Clinic. (2020). Balance exercises. Retrieved from https://www.mayoclinic.org/healthy-lifestyle/fitness/multimedia/balance-exercises/sls-20076853
YogDev. (2016, September 3). 11 Anjaneyasana (lunge) front foot on top of yoga wheel. Retrieved from https://youtu.be/jZ1tRlLYgZw
